SegmentationImage#
- class photutils.segmentation.SegmentationImage(data)[source]#
Bases:
objectClass for a segmentation image.
- Parameters:
- data2D int
ndarray A 2D segmentation array where source regions are labeled by different positive integer values. A value of zero is reserved for the background. The segmentation image must have integer type.
- data2D int
Notes
The
SegmentationImageinstance may be sliced, but note that the slicedSegmentationImagedata array will be a view into the originalSegmentationImagearray (this is the same behavior asndarray). Explicitly use theSegmentationImage.copy()method to create a copy of the slicedSegmentationImage.Attributes Summary
A 1D array of areas (in pixel**2) of the non-zero labeled regions.
The area (in pixel**2) of the background (label=0) region.
A list of
BoundingBoxof the minimal bounding boxes containing the labeled regions.A matplotlib colormap consisting of (random) muted colors.
The segmentation array.
A
MaskedArrayversion of the segmentation array where the background (label = 0) has been masked.A dictionary mapping deblended label numbers to the original parent label numbers.
A sorted 1D array of deblended label numbers.
Boolean value indicating whether the non-zero labels in the segmentation array are consecutive and start from 1.
The sorted non-zero labels in the segmentation array.
The maximum label in the segmentation array.
A 1D
ndarrayof the sorted non-zero labels that are missing in the consecutive sequence from one to the maximum label number.The number of non-zero labels in the segmentation array.
A dictionary mapping the original parent label numbers to the deblended label numbers.
A list of Shapely polygons representing each source segment.
A list of
Segmentobjects.The shape of the segmentation array.
A list of tuples, where each tuple contains two slices representing the minimal box that contains the labeled region.
Methods Summary
check_label(label)Check that the input label is a valid label number within the segmentation array.
check_labels(labels)Check that the input label(s) are valid label numbers within the segmentation array.
copy()Return a deep copy of this object.
get_area(label)The area (in pixel**2) of the region for the input label.
get_areas(labels)The areas (in pixel**2) of the regions for the input labels.
get_index(label)Find the index of the input
label.get_indices(labels)Find the indices of the input
labels.get_patch(label, *[, origin, scale])Return a
PathPatchfor the given label.get_patches(labels, *[, origin, scale])Return a list of
PathPatchobjects for the given labels.get_polygon(label)Return the Shapely polygon for the given label.
get_polygons(labels)Return a list of Shapely polygons for the given labels.
get_region(label, **kwargs)Return the regions region object for the given label.
get_regions(labels, **kwargs)Return a list of regions region objects for the given labels.
get_segment(label)Return a
Segmentobject for the given label.get_segments(labels)Return a list of
Segmentobjects for the given labels.imshow([ax, figsize, dpi, cmap, alpha])Display the segmentation image in a matplotlib
Axesinstance.imshow_map([ax, figsize, dpi, cmap, alpha, ...])Display the segmentation image in a matplotlib
Axesinstance with a colorbar.keep_label(label[, relabel])Keep only the specified label.
keep_labels(labels[, relabel])Keep only the specified labels.
make_cmap([background_color, seed])Define a matplotlib colormap consisting of (random) muted colors.
make_source_mask(*[, size, footprint])Make a source mask from the segmentation image.
plot_patches(*[, ax, origin, scale, labels])Plot the
PathPatchobjects for the source segments on a matplotlibAxesinstance.reassign_label(label, new_label[, relabel])Reassign a label number to a new number.
reassign_labels(labels, new_label[, relabel])Reassign one or more label numbers.
relabel_consecutive([start_label])Reassign the label numbers consecutively starting from a given label number.
remove_border_labels(border_width[, ...])Remove labeled segments near the array border.
remove_label(label[, relabel])Remove the label number.
remove_labels(labels[, relabel])Remove one or more labels.
remove_masked_labels(mask[, ...])Remove labeled segments located within a masked region.
reset_cmap([seed])Reset the colormap (
cmapattribute) to a new random colormap.to_patches(*[, origin, scale])Return a list of
PathPatchobjects representing each source segment.to_regions(*[, group])Return the
regions.Regionobjects representing the source segments.Attributes Documentation
- areas#
A 1D array of areas (in pixel**2) of the non-zero labeled regions.
The
ndarraystarts with the non-zero label. The returned array has a length equal to the number of labels and matches the order of thelabelsattribute.
- background_area#
The area (in pixel**2) of the background (label=0) region.
- bbox#
A list of
BoundingBoxof the minimal bounding boxes containing the labeled regions.
- cmap#
A matplotlib colormap consisting of (random) muted colors.
This is useful for plotting the segmentation array.
- data#
The segmentation array.
- data_masked#
A
MaskedArrayversion of the segmentation array where the background (label = 0) has been masked.
- deblended_label_to_parent#
A dictionary mapping deblended label numbers to the original parent label numbers.
The keys are the deblended label numbers and the values are the original parent label numbers. Only deblended sources are included in the dictionary.
The dictionary will be empty if deblending has not been performed or if no sources were deblended.
- deblended_labels#
A sorted 1D array of deblended label numbers.
The list will be empty if deblending has not been performed or if no sources were deblended.
- is_consecutive#
Boolean value indicating whether the non-zero labels in the segmentation array are consecutive and start from 1.
- labels#
The sorted non-zero labels in the segmentation array.
- max_label#
The maximum label in the segmentation array.
- missing_labels#
A 1D
ndarrayof the sorted non-zero labels that are missing in the consecutive sequence from one to the maximum label number.
- n_labels#
The number of non-zero labels in the segmentation array.
- parent_to_deblended_labels#
A dictionary mapping the original parent label numbers to the deblended label numbers.
The keys are the original parent label numbers and the values are the deblended label numbers. Only deblended sources are included in the dictionary.
The dictionary will be empty if deblending has not been performed or if no sources were deblended.
- polygons#
A list of Shapely polygons representing each source segment.
Polygon or MultiPolygon objects are returned, depending on whether the source segment is a single polygon or multiple polygons (e.g., holes or non-contiguous) for the same label.
- segments#
A list of
Segmentobjects.The list starts with the non-zero label. The returned list has a length equal to the number of labels and matches the order of the
labelsattribute.
- shape#
The shape of the segmentation array.
- slices#
A list of tuples, where each tuple contains two slices representing the minimal box that contains the labeled region.
The list starts with the non-zero label. The returned list has a length equal to the number of labels and matches the order of the
labelsattribute.
Methods Documentation
- check_label(label)[source]#
Check that the input label is a valid label number within the segmentation array.
- Parameters:
- labelint
The label number to check.
- Raises:
- ValueError
If the input
labelis invalid.
- check_labels(labels)[source]#
Check that the input label(s) are valid label numbers within the segmentation array.
- Parameters:
- labelsint, 1D array_like (int)
The label(s) to check.
- Raises:
- ValueError
If any input
labelsare invalid.
- copy()[source]#
Return a deep copy of this object.
- Returns:
- result
SegmentationImage A deep copy of this object.
- result
- get_area(label)[source]#
The area (in pixel**2) of the region for the input label.
- Parameters:
- labelint
The label whose area to return. Label must be non-zero.
- Returns:
- areafloat
The area of the labeled region.
- get_areas(labels)[source]#
The areas (in pixel**2) of the regions for the input labels.
- Parameters:
- labelsint, 1D array_like (int)
The label(s) for which to return areas. Label must be non-zero.
- Returns:
- areas
ndarray The areas of the labeled regions.
- areas
- get_index(label)[source]#
Find the index of the input
label.- Parameters:
- labelint
The label number to find.
- Returns:
- indexint
The array index.
- Raises:
- ValueError
If
labelis invalid.
- get_indices(labels)[source]#
Find the indices of the input
labels.- Parameters:
- labelsint, array_like (1D, int)
The label numbers(s) to find.
- Returns:
- indicesint
ndarray An integer array of indices with the same shape as
labels. Iflabelsis a scalar, then the returned index will also be a scalar.
- indicesint
- Raises:
- ValueError
If any input
labelsare invalid.
- get_patch(label, *, origin=(0, 0), scale=1.0, **kwargs)[source]#
Return a
PathPatchfor the given label.By default, the patch will have a white edge color and no face color.
- Parameters:
- labelint
The label number.
- originarray_like, optional
The
(x, y)position of the origin of the displayed image. This effectively translates the position of the polygon.- scalefloat, optional
The scale factor applied to the polygon vertices.
- **kwargsdict, optional
Any keyword arguments accepted by
matplotlib.patches.PathPatch.
- Returns:
- Raises:
- TypeError
If
labelis not a scalar.- ValueError
If
labelis invalid.
- get_patches(labels, *, origin=(0, 0), scale=1.0, **kwargs)[source]#
Return a list of
PathPatchobjects for the given labels.By default, the patches will have a white edge color and no face color.
- Parameters:
- labelsint, array_like (1D, int)
The label number(s).
- originarray_like, optional
The
(x, y)position of the origin of the displayed image. This effectively translates the position of the polygons.- scalefloat, optional
The scale factor applied to the polygon vertices.
- **kwargsdict, optional
Any keyword arguments accepted by
matplotlib.patches.PathPatch.
- Returns:
- patcheslist of
PathPatch A list of matplotlib patches for the source segments.
- patcheslist of
- Raises:
- ValueError
If any input
labelsare invalid.
- get_polygon(label)[source]#
Return the Shapely polygon for the given label.
- Parameters:
- labelint
The label number.
- Returns:
- polygon
shapely.Polygonorshapely.MultiPolygonorNone A Shapely Polygon or MultiPolygon object, or
Noneif rasterio and shapely are not available.
- polygon
- Raises:
- TypeError
If
labelis not a scalar.- ValueError
If
labelis invalid.
- get_polygons(labels)[source]#
Return a list of Shapely polygons for the given labels.
- Parameters:
- labelsint, array_like (1D, int)
The label number(s).
- Returns:
- polygonslist of
shapely.Polygon,shapely.MultiPolygon, orNone A list of Shapely Polygon or MultiPolygon objects, or
Noneelements if rasterio and shapely are not available.
- polygonslist of
- Raises:
- ValueError
If any input
labelsare invalid.
- get_region(label, **kwargs)[source]#
Return the regions region object for the given label.
The returned polygon region is defined as the exterior of the source segment. Interior holes within the source segment are not included.
- Parameters:
- labelint
The label number.
- **kwargsdict, optional
Any keyword arguments accepted by
regions.RegionVisual. Common keywords includeedgecolor,facecolor,color,linewidth, andlinestyle.
- Returns:
- region
PolygonPixelRegionorRegions A
PolygonPixelRegionobject, or aRegionsobject if the segment is a MultiPolygon (e.g., non-contiguous).
- region
- Raises:
- TypeError
If
labelis not a scalar.- ValueError
If
labelis invalid.
- get_regions(labels, **kwargs)[source]#
Return a list of regions region objects for the given labels.
The returned polygon regions are defined as the exteriors of the source segments. Interior holes within the source segments are not included.
- Parameters:
- labelsint, array_like (1D, int)
The label number(s).
- **kwargsdict, optional
Any keyword arguments accepted by
regions.RegionVisual. Common keywords includeedgecolor,facecolor,color,linewidth, andlinestyle.
- Returns:
- regionslist of
PolygonPixelRegionorRegions A list of
PolygonPixelRegionobjects, orRegionsobjects for labels with MultiPolygon segments (e.g., non-contiguous).
- regionslist of
- Raises:
- ValueError
If any input
labelsare invalid.
- get_segment(label)[source]#
Return a
Segmentobject for the given label.This is significantly faster than
segments[index]for segmentation images with many labels because it constructs only the requestedSegmentwithout building the full list.- Parameters:
- labelint
The segment label number.
- Returns:
- segment
Segment The segment object for the input label.
- segment
- Raises:
- TypeError
If
labelis not a scalar.- ValueError
If
labelis invalid.
- get_segments(labels)[source]#
Return a list of
Segmentobjects for the given labels.This is significantly faster than indexing into
segmentswhen only a subset of labels is needed because it constructs only the requestedSegmentobjects without building the full list.
- imshow(ax=None, figsize=None, dpi=None, cmap=None, alpha=None)[source]#
Display the segmentation image in a matplotlib
Axesinstance.The segmentation image will be displayed with “nearest” interpolation and with the origin set to “lower”.
- Parameters:
- ax
matplotlib.axes.AxesorNone, optional The matplotlib axes on which to plot. If
None, then a newAxesinstance will be created.- figsize2-tuple of floats or
None, optional The figure dimension (width, height) in inches when creating a new Axes. This keyword is ignored if
axesis input.- dpifloat or
None, optional The figure dots per inch when creating a new Axes. This keyword is ignored if
axesis input.- cmap
matplotlib.colors.Colormap, str, orNone, optional The
Colormapinstance or a registered matplotlib colormap name used to map scalar data to colors. IfNone, then the colormap defined by thecmapattribute will be used.- alphafloat, array_like, or
None, optional The alpha blending value, between 0 (transparent) and 1 (opaque). If alpha is an array, the alpha blending values are applied pixel by pixel, and alpha must have the same shape as the segmentation image.
- ax
- Returns:
- result
matplotlib.image.AxesImage An image attached to an
matplotlib.axes.Axes.
- result
Examples
import matplotlib.pyplot as plt
import numpy as np
from photutils.segmentation import SegmentationImage

data = np.array([[1, 1, 0, 0, 4, 4],
                 [0, 0, 0, 0, 0, 4],
                 [0, 0, 3, 3, 0, 0],
                 [7, 0, 0, 0, 0, 5],
                 [7, 7, 0, 5, 5, 5],
                 [7, 7, 0, 0, 5, 5]])
segm = SegmentationImage(data)

fig, ax = plt.subplots()
im = segm.imshow(ax=ax)
fig.colorbar(im, ax=ax)
(
Source code,png,hires.png,pdf,svg)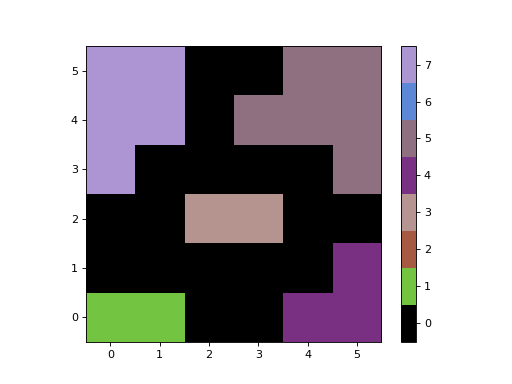
- imshow_map(ax=None, figsize=None, dpi=None, cmap=None, alpha=None, max_labels=25, cbar_labelsize=None)[source]#
Display the segmentation image in a matplotlib
Axesinstance with a colorbar.This method is useful for displaying segmentation images that have a few labels (e.g., from a cutout) that are not consecutive. It maps the labels to be consecutive integers starting from 1 before plotting. The plotted image values are not the label values, but the colorbar tick labels are used to show the original labels.
The segmentation image will be displayed with “nearest” interpolation and with the origin set to “lower”.
- Parameters:
- ax
matplotlib.axes.AxesorNone, optional The matplotlib axes on which to plot. If
None, then a newAxesinstance will be created.- figsize2-tuple of floats or
None, optional The figure dimension (width, height) in inches when creating a new Axes. This keyword is ignored if
axesis input.- dpifloat or
None, optional The figure dots per inch when creating a new Axes. This keyword is ignored if
axesis input.- cmap
matplotlib.colors.Colormap, str, orNone, optional The
Colormapinstance or a registered matplotlib colormap name used to map scalar data to colors. IfNone, then the colormap defined by thecmapattribute will be used.- alphafloat, array_like, or
None, optional The alpha blending value, between 0 (transparent) and 1 (opaque). If alpha is an array, the alpha blending values are applied pixel by pixel, and alpha must have the same shape as the segmentation image.
- max_labelsint, optional
The maximum number of labels to display in the colorbar. If the number of labels is greater than
max_labels, then the colorbar will not be displayed.- cbar_labelsize
Noneor float, optional The font size of the colorbar tick labels.
- ax
- Returns:
- result
matplotlib.image.AxesImage An image attached to an
matplotlib.axes.Axes.- cbar_infotuple or
None The colorbar information as a tuple containing the
Colorbarinstance, andarrayof tick positions, and andarrayof tick labels.Noneis returned if the colorbar was not plotted.
- result
Examples
import matplotlib.pyplot as plt
import numpy as np
from photutils.segmentation import SegmentationImage

data = np.array([[1, 1, 0, 0, 4, 4],
                 [0, 0, 0, 0, 0, 4],
                 [0, 0, 3, 3, 0, 0],
                 [7, 0, 0, 0, 0, 5],
                 [7, 7, 0, 5, 5, 5],
                 [7, 7, 0, 0, 5, 5]])
data *= 1000
segm = SegmentationImage(data)

fig, ax = plt.subplots()
im, cbar = segm.imshow_map(ax=ax)
(
Source code,png,hires.png,pdf,svg)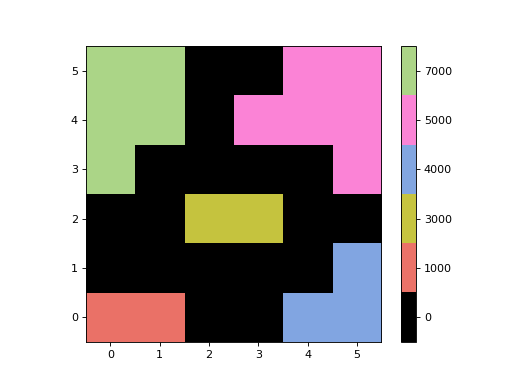
- keep_label(label, relabel=False)[source]#
Keep only the specified label.
- Parameters:
- labelint
The label number to keep.
- relabelbool, optional
If
True, then the single segment will be assigned a label value of 1.
Examples
>>> from photutils.segmentation import SegmentationImage
>>> data = np.array([[1, 1, 0, 0, 4, 4],
...                  [0, 0, 0, 0, 0, 4],
...                  [0, 0, 3, 3, 0, 0],
...                  [7, 0, 0, 0, 0, 5],
...                  [7, 7, 0, 5, 5, 5],
...                  [7, 7, 0, 0, 5, 5]])
>>> segm = SegmentationImage(data)
>>> segm.keep_label(label=3)
>>> segm.data
array([[0, 0, 0, 0, 0, 0],
       [0, 0, 0, 0, 0, 0],
       [0, 0, 3, 3, 0, 0],
       [0, 0, 0, 0, 0, 0],
       [0, 0, 0, 0, 0, 0],
       [0, 0, 0, 0, 0, 0]])
>>> data = np.array([[1, 1, 0, 0, 4, 4],
...                  [0, 0, 0, 0, 0, 4],
...                  [0, 0, 3, 3, 0, 0],
...                  [7, 0, 0, 0, 0, 5],
...                  [7, 7, 0, 5, 5, 5],
...                  [7, 7, 0, 0, 5, 5]])
>>> segm = SegmentationImage(data)
>>> segm.keep_label(label=3, relabel=True)
>>> segm.data
array([[0, 0, 0, 0, 0, 0],
       [0, 0, 0, 0, 0, 0],
       [0, 0, 1, 1, 0, 0],
       [0, 0, 0, 0, 0, 0],
       [0, 0, 0, 0, 0, 0],
       [0, 0, 0, 0, 0, 0]])
- keep_labels(labels, relabel=False)[source]#
Keep only the specified labels.
- Parameters:
- labelsint, array_like (1D, int)
The label number(s) to keep.
- relabelbool, optional
If
True, then the segmentation array will be relabeled such that the labels are in consecutive order starting from 1.
Examples
>>> from photutils.segmentation import SegmentationImage
>>> data = np.array([[1, 1, 0, 0, 4, 4],
...                  [0, 0, 0, 0, 0, 4],
...                  [0, 0, 3, 3, 0, 0],
...                  [7, 0, 0, 0, 0, 5],
...                  [7, 7, 0, 5, 5, 5],
...                  [7, 7, 0, 0, 5, 5]])
>>> segm = SegmentationImage(data)
>>> segm.keep_labels(labels=[5, 3])
>>> segm.data
array([[0, 0, 0, 0, 0, 0],
       [0, 0, 0, 0, 0, 0],
       [0, 0, 3, 3, 0, 0],
       [0, 0, 0, 0, 0, 5],
       [0, 0, 0, 5, 5, 5],
       [0, 0, 0, 0, 5, 5]])
>>> data = np.array([[1, 1, 0, 0, 4, 4],
...                  [0, 0, 0, 0, 0, 4],
...                  [0, 0, 3, 3, 0, 0],
...                  [7, 0, 0, 0, 0, 5],
...                  [7, 7, 0, 5, 5, 5],
...                  [7, 7, 0, 0, 5, 5]])
>>> segm = SegmentationImage(data)
>>> segm.keep_labels(labels=[5, 3], relabel=True)
>>> segm.data
array([[0, 0, 0, 0, 0, 0],
       [0, 0, 0, 0, 0, 0],
       [0, 0, 1, 1, 0, 0],
       [0, 0, 0, 0, 0, 2],
       [0, 0, 0, 2, 2, 2],
       [0, 0, 0, 0, 2, 2]])
- make_cmap(background_color='#000000ff', seed=None)[source]#
Define a matplotlib colormap consisting of (random) muted colors.
This is useful for plotting the segmentation array.
- Parameters:
- background_colorMatplotlib color, optional
The color of the first color in the colormap. The color may be specified using any of the Matplotlib color formats. This color will be used as the background color (label = 0) when plotting the segmentation image. The default color is black with alpha=1.0 (‘#000000ff’).
- seedint, optional
A seed to initialize the
numpy.random.BitGenerator. IfNone, then fresh, unpredictable entropy will be pulled from the OS. Separate function calls with the sameseedwill generate the same colormap.
- Returns:
- cmap
matplotlib.colors.ListedColormap The matplotlib colormap with colors in RGBA format.
- cmap
- make_source_mask(*, size=None, footprint=None)[source]#
Make a source mask from the segmentation image.
Use the
sizeorfootprintkeyword to perform binary dilation on the segmentation image mask.- Parameters:
- sizeint or tuple of int, optional
The size along each axis of the rectangular footprint used for the source dilation. If
sizeis a scalar, then a square footprint ofsizewill be used. Ifsizehas two elements, they must be in(ny, nx)order.sizeshould have odd values for each axis. To perform source dilation, eithersizeorfootprintmust be defined. If they are both defined, thenfootprintoverridessize.- footprint2D
ndarray, optional The local footprint used for the source dilation. Non-zero elements are considered
True.size=(n, m)is equivalent tofootprint=np.ones((n, m)). To perform source dilation, eithersizeorfootprintmust be defined. If they are both defined, thenfootprintoverridessize.
- Returns:
- mask2D bool
ndarray A 2D boolean image containing the source mask.
- mask2D bool
Notes
When performing source dilation, using a square footprint will be much faster than using other shapes (e.g., a circular footprint). Source dilation also is slower for larger images and larger footprints.
Examples
>>> import numpy as np
>>> from photutils.segmentation import SegmentationImage
>>> from photutils.utils import circular_footprint
>>> data = np.zeros((7, 7), dtype=int)
>>> data[3, 3] = 1
>>> segm = SegmentationImage(data)
>>> segm.data
array([[0, 0, 0, 0, 0, 0, 0],
       [0, 0, 0, 0, 0, 0, 0],
       [0, 0, 0, 0, 0, 0, 0],
       [0, 0, 0, 1, 0, 0, 0],
       [0, 0, 0, 0, 0, 0, 0],
       [0, 0, 0, 0, 0, 0, 0],
       [0, 0, 0, 0, 0, 0, 0]])
>>> mask0 = segm.make_source_mask()
>>> mask0
array([[False, False, False, False, False, False, False],
       [False, False, False, False, False, False, False],
       [False, False, False, False, False, False, False],
       [False, False, False,  True, False, False, False],
       [False, False, False, False, False, False, False],
       [False, False, False, False, False, False, False],
       [False, False, False, False, False, False, False]])
>>> mask1 = segm.make_source_mask(size=3)
>>> mask1
array([[False, False, False, False, False, False, False],
       [False, False, False, False, False, False, False],
       [False, False,  True,  True,  True, False, False],
       [False, False,  True,  True,  True, False, False],
       [False, False,  True,  True,  True, False, False],
       [False, False, False, False, False, False, False],
       [False, False, False, False, False, False, False]])
>>> footprint = circular_footprint(radius=3)
>>> mask2 = segm.make_source_mask(footprint=footprint)
>>> mask2
array([[False, False, False,  True, False, False, False],
       [False,  True,  True,  True,  True,  True, False],
       [False,  True,  True,  True,  True,  True, False],
       [ True,  True,  True,  True,  True,  True,  True],
       [False,  True,  True,  True,  True,  True, False],
       [False,  True,  True,  True,  True,  True, False],
       [False, False, False,  True, False, False, False]])
- plot_patches(*, ax=None, origin=(0, 0), scale=1.0, labels=None, **kwargs)[source]#
Plot the
PathPatchobjects for the source segments on a matplotlibAxesinstance.- Parameters:
- ax
matplotlib.axes.AxesorNone, optional The matplotlib axes on which to plot. If
None, then the currentAxesinstance is used.- originarray_like, optional
The
(x, y)position of the origin of the displayed image.- scalefloat, optional
The scale factor applied to the polygon vertices.
- labelsint or array of int, optional
The label numbers whose polygons are to be plotted. If
None, the polygons for all labels will be plotted.- **kwargsdict, optional
Any keyword arguments accepted by
matplotlib.patches.PathPatch.
- ax
- Returns:
- patcheslist of
PathPatch A list of matplotlib patches for the plotted polygons. The patches can be used, for example, when adding a plot legend.
- patcheslist of
Examples
import numpy as np
from photutils.segmentation import SegmentationImage

data = np.array([[1, 1, 0, 0, 4, 4],
                 [0, 0, 0, 0, 0, 4],
                 [0, 0, 3, 3, 0, 0],
                 [7, 0, 0, 0, 0, 5],
                 [7, 7, 0, 5, 5, 5],
                 [7, 7, 0, 0, 5, 5]])
segm = SegmentationImage(data)
segm.imshow(figsize=(5, 5))
segm.plot_patches(edgecolor='white', lw=2)
(
Source code,png,hires.png,pdf,svg)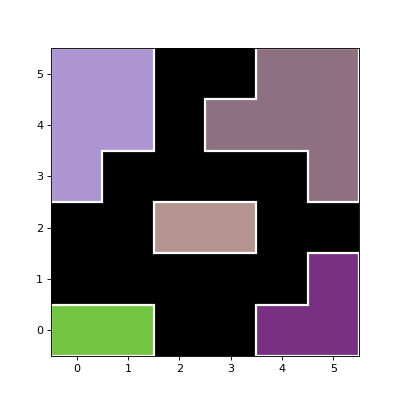
- reassign_label(label, new_label, relabel=False)[source]#
Reassign a label number to a new number.
If
new_labelis already present in the segmentation array, then it will be combined with the inputlabelnumber. Note that this can result in a label that is no longer pixel connected.- Parameters:
- labelint
The label number to reassign.
- new_labelint
The newly assigned label number.
- relabelbool, optional
If
True, then the segmentation array will be relabeled such that the labels are in consecutive order starting from 1.
Examples
>>> from photutils.segmentation import SegmentationImage
>>> data = np.array([[1, 1, 0, 0, 4, 4],
...                  [0, 0, 0, 0, 0, 4],
...                  [0, 0, 3, 3, 0, 0],
...                  [7, 0, 0, 0, 0, 5],
...                  [7, 7, 0, 5, 5, 5],
...                  [7, 7, 0, 0, 5, 5]])
>>> segm = SegmentationImage(data)
>>> segm.reassign_label(label=1, new_label=2)
>>> segm.data
array([[2, 2, 0, 0, 4, 4],
       [0, 0, 0, 0, 0, 4],
       [0, 0, 3, 3, 0, 0],
       [7, 0, 0, 0, 0, 5],
       [7, 7, 0, 5, 5, 5],
       [7, 7, 0, 0, 5, 5]])
>>> data = np.array([[1, 1, 0, 0, 4, 4],
...                  [0, 0, 0, 0, 0, 4],
...                  [0, 0, 3, 3, 0, 0],
...                  [7, 0, 0, 0, 0, 5],
...                  [7, 7, 0, 5, 5, 5],
...                  [7, 7, 0, 0, 5, 5]])
>>> segm = SegmentationImage(data)
>>> segm.reassign_label(label=1, new_label=4)
>>> segm.data
array([[4, 4, 0, 0, 4, 4],
       [0, 0, 0, 0, 0, 4],
       [0, 0, 3, 3, 0, 0],
       [7, 0, 0, 0, 0, 5],
       [7, 7, 0, 5, 5, 5],
       [7, 7, 0, 0, 5, 5]])
>>> data = np.array([[1, 1, 0, 0, 4, 4],
...                  [0, 0, 0, 0, 0, 4],
...                  [0, 0, 3, 3, 0, 0],
...                  [7, 0, 0, 0, 0, 5],
...                  [7, 7, 0, 5, 5, 5],
...                  [7, 7, 0, 0, 5, 5]])
>>> segm = SegmentationImage(data)
>>> segm.reassign_label(label=1, new_label=4, relabel=True)
>>> segm.data
array([[2, 2, 0, 0, 2, 2],
       [0, 0, 0, 0, 0, 2],
       [0, 0, 1, 1, 0, 0],
       [4, 0, 0, 0, 0, 3],
       [4, 4, 0, 3, 3, 3],
       [4, 4, 0, 0, 3, 3]])
- reassign_labels(labels, new_label, relabel=False)[source]#
Reassign one or more label numbers.
Multiple input
labelswill all be reassigned to the samenew_labelnumber. Ifnew_labelis already present in the segmentation array, then it will be combined with the inputlabels. Note that both of these can result in a label that is no longer pixel connected.- Parameters:
- labelsint, array_like (1D, int)
The label numbers(s) to reassign.
- new_labelint
The reassigned label number.
- relabelbool, optional
If
True, then the segmentation array will be relabeled such that the labels are in consecutive order starting from 1.
Examples
>>> from photutils.segmentation import SegmentationImage
>>> data = np.array([[1, 1, 0, 0, 4, 4],
...                  [0, 0, 0, 0, 0, 4],
...                  [0, 0, 3, 3, 0, 0],
...                  [7, 0, 0, 0, 0, 5],
...                  [7, 7, 0, 5, 5, 5],
...                  [7, 7, 0, 0, 5, 5]])
>>> segm = SegmentationImage(data)
>>> segm.reassign_labels(labels=[1, 7], new_label=2)
>>> segm.data
array([[2, 2, 0, 0, 4, 4],
       [0, 0, 0, 0, 0, 4],
       [0, 0, 3, 3, 0, 0],
       [2, 0, 0, 0, 0, 5],
       [2, 2, 0, 5, 5, 5],
       [2, 2, 0, 0, 5, 5]])
>>> data = np.array([[1, 1, 0, 0, 4, 4],
...                  [0, 0, 0, 0, 0, 4],
...                  [0, 0, 3, 3, 0, 0],
...                  [7, 0, 0, 0, 0, 5],
...                  [7, 7, 0, 5, 5, 5],
...                  [7, 7, 0, 0, 5, 5]])
>>> segm = SegmentationImage(data)
>>> segm.reassign_labels(labels=[1, 7], new_label=4)
>>> segm.data
array([[4, 4, 0, 0, 4, 4],
       [0, 0, 0, 0, 0, 4],
       [0, 0, 3, 3, 0, 0],
       [4, 0, 0, 0, 0, 5],
       [4, 4, 0, 5, 5, 5],
       [4, 4, 0, 0, 5, 5]])
>>> data = np.array([[1, 1, 0, 0, 4, 4],
...                  [0, 0, 0, 0, 0, 4],
...                  [0, 0, 3, 3, 0, 0],
...                  [7, 0, 0, 0, 0, 5],
...                  [7, 7, 0, 5, 5, 5],
...                  [7, 7, 0, 0, 5, 5]])
>>> segm = SegmentationImage(data)
>>> segm.reassign_labels(labels=[1, 7], new_label=2, relabel=True)
>>> segm.data
array([[1, 1, 0, 0, 3, 3],
       [0, 0, 0, 0, 0, 3],
       [0, 0, 2, 2, 0, 0],
       [1, 0, 0, 0, 0, 4],
       [1, 1, 0, 4, 4, 4],
       [1, 1, 0, 0, 4, 4]])
- relabel_consecutive(start_label=1)[source]#
Reassign the label numbers consecutively starting from a given label number.
- Parameters:
- start_labelint, optional
The starting label number, which should be a strictly positive integer. The default is 1.
Examples
>>> from photutils.segmentation import SegmentationImage
>>> data = np.array([[1, 1, 0, 0, 4, 4],
...                  [0, 0, 0, 0, 0, 4],
...                  [0, 0, 3, 3, 0, 0],
...                  [7, 0, 0, 0, 0, 5],
...                  [7, 7, 0, 5, 5, 5],
...                  [7, 7, 0, 0, 5, 5]])
>>> segm = SegmentationImage(data)
>>> segm.relabel_consecutive()
>>> segm.data
array([[1, 1, 0, 0, 3, 3],
       [0, 0, 0, 0, 0, 3],
       [0, 0, 2, 2, 0, 0],
       [5, 0, 0, 0, 0, 4],
       [5, 5, 0, 4, 4, 4],
       [5, 5, 0, 0, 4, 4]])
- remove_border_labels(border_width, partial_overlap=True, relabel=False)[source]#
Remove labeled segments near the array border.
Labels within the defined border region will be removed.
- Parameters:
- border_widthint
The width of the border region in pixels.
- partial_overlapbool, optional
If this is set to
True(the default), a segment that partially extends into the border region will be removed. Segments that are completely within the border region are always removed.- relabelbool, optional
If
True, then the segmentation array will be relabeled such that the labels are in consecutive order starting from 1.
Examples
>>> from photutils.segmentation import SegmentationImage
>>> data = np.array([[1, 1, 0, 0, 4, 4],
...                  [0, 0, 0, 0, 0, 4],
...                  [0, 0, 3, 3, 0, 0],
...                  [7, 0, 0, 0, 0, 5],
...                  [7, 7, 0, 5, 5, 5],
...                  [7, 7, 0, 0, 5, 5]])
>>> segm = SegmentationImage(data)
>>> segm.remove_border_labels(border_width=1)
>>> segm.data
array([[0, 0, 0, 0, 0, 0],
       [0, 0, 0, 0, 0, 0],
       [0, 0, 3, 3, 0, 0],
       [0, 0, 0, 0, 0, 0],
       [0, 0, 0, 0, 0, 0],
       [0, 0, 0, 0, 0, 0]])
>>> data = np.array([[1, 1, 0, 0, 4, 4],
...                  [0, 0, 0, 0, 0, 4],
...                  [0, 0, 3, 3, 0, 0],
...                  [7, 0, 0, 0, 0, 5],
...                  [7, 7, 0, 5, 5, 5],
...                  [7, 7, 0, 0, 5, 5]])
>>> segm = SegmentationImage(data)
>>> segm.remove_border_labels(border_width=1,
...                           partial_overlap=False)
>>> segm.data
array([[0, 0, 0, 0, 0, 0],
       [0, 0, 0, 0, 0, 0],
       [0, 0, 3, 3, 0, 0],
       [7, 0, 0, 0, 0, 5],
       [7, 7, 0, 5, 5, 5],
       [7, 7, 0, 0, 5, 5]])
- remove_label(label, relabel=False)[source]#
Remove the label number.
The removed label is assigned a value of zero (i.e., background).
- Parameters:
- labelint
The label number to remove.
- relabelbool, optional
If
True, then the segmentation array will be relabeled such that the labels are in consecutive order starting from 1.
Examples
>>> from photutils.segmentation import SegmentationImage
>>> data = np.array([[1, 1, 0, 0, 4, 4],
...                  [0, 0, 0, 0, 0, 4],
...                  [0, 0, 3, 3, 0, 0],
...                  [7, 0, 0, 0, 0, 5],
...                  [7, 7, 0, 5, 5, 5],
...                  [7, 7, 0, 0, 5, 5]])
>>> segm = SegmentationImage(data)
>>> segm.remove_label(label=5)
>>> segm.data
array([[1, 1, 0, 0, 4, 4],
       [0, 0, 0, 0, 0, 4],
       [0, 0, 3, 3, 0, 0],
       [7, 0, 0, 0, 0, 0],
       [7, 7, 0, 0, 0, 0],
       [7, 7, 0, 0, 0, 0]])
>>> data = np.array([[1, 1, 0, 0, 4, 4],
...                  [0, 0, 0, 0, 0, 4],
...                  [0, 0, 3, 3, 0, 0],
...                  [7, 0, 0, 0, 0, 5],
...                  [7, 7, 0, 5, 5, 5],
...                  [7, 7, 0, 0, 5, 5]])
>>> segm = SegmentationImage(data)
>>> segm.remove_label(label=5, relabel=True)
>>> segm.data
array([[1, 1, 0, 0, 3, 3],
       [0, 0, 0, 0, 0, 3],
       [0, 0, 2, 2, 0, 0],
       [4, 0, 0, 0, 0, 0],
       [4, 4, 0, 0, 0, 0],
       [4, 4, 0, 0, 0, 0]])
- remove_labels(labels, relabel=False)[source]#
Remove one or more labels.
Removed labels are assigned a value of zero (i.e., background).
- Parameters:
- labelsint, array_like (1D, int)
The label number(s) to remove.
- relabelbool, optional
If
True, then the segmentation array will be relabeled such that the labels are in consecutive order starting from 1.
Examples
>>> from photutils.segmentation import SegmentationImage
>>> data = np.array([[1, 1, 0, 0, 4, 4],
...                  [0, 0, 0, 0, 0, 4],
...                  [0, 0, 3, 3, 0, 0],
...                  [7, 0, 0, 0, 0, 5],
...                  [7, 7, 0, 5, 5, 5],
...                  [7, 7, 0, 0, 5, 5]])
>>> segm = SegmentationImage(data)
>>> segm.remove_labels(labels=[5, 3])
>>> segm.data
array([[1, 1, 0, 0, 4, 4],
       [0, 0, 0, 0, 0, 4],
       [0, 0, 0, 0, 0, 0],
       [7, 0, 0, 0, 0, 0],
       [7, 7, 0, 0, 0, 0],
       [7, 7, 0, 0, 0, 0]])
>>> data = np.array([[1, 1, 0, 0, 4, 4],
...                  [0, 0, 0, 0, 0, 4],
...                  [0, 0, 3, 3, 0, 0],
...                  [7, 0, 0, 0, 0, 5],
...                  [7, 7, 0, 5, 5, 5],
...                  [7, 7, 0, 0, 5, 5]])
>>> segm = SegmentationImage(data)
>>> segm.remove_labels(labels=[5, 3], relabel=True)
>>> segm.data
array([[1, 1, 0, 0, 2, 2],
       [0, 0, 0, 0, 0, 2],
       [0, 0, 0, 0, 0, 0],
       [3, 0, 0, 0, 0, 0],
       [3, 3, 0, 0, 0, 0],
       [3, 3, 0, 0, 0, 0]])
- remove_masked_labels(mask, partial_overlap=True, relabel=False)[source]#
Remove labeled segments located within a masked region.
- Parameters:
- maskarray_like (bool)
A boolean mask, with the same shape as the segmentation array, where
Truevalues indicate masked pixels.- partial_overlapbool, optional
If this is set to
True(default), a segment that partially extends into a masked region will also be removed. Segments that are completely within a masked region are always removed.- relabelbool, optional
If
True, then the segmentation array will be relabeled such that the labels are in consecutive order starting from 1.
Examples
>>> from photutils.segmentation import SegmentationImage
>>> data = np.array([[1, 1, 0, 0, 4, 4],
...                  [0, 0, 0, 0, 0, 4],
...                  [0, 0, 3, 3, 0, 0],
...                  [7, 0, 0, 0, 0, 5],
...                  [7, 7, 0, 5, 5, 5],
...                  [7, 7, 0, 0, 5, 5]])
>>> segm = SegmentationImage(data)
>>> mask = np.zeros(segm.data.shape, dtype=bool)
>>> mask[0, :] = True  # mask the first row
>>> segm.remove_masked_labels(mask)
>>> segm.data
array([[0, 0, 0, 0, 0, 0],
       [0, 0, 0, 0, 0, 0],
       [0, 0, 3, 3, 0, 0],
       [7, 0, 0, 0, 0, 5],
       [7, 7, 0, 5, 5, 5],
       [7, 7, 0, 0, 5, 5]])
>>> data = np.array([[1, 1, 0, 0, 4, 4],
...                  [0, 0, 0, 0, 0, 4],
...                  [0, 0, 3, 3, 0, 0],
...                  [7, 0, 0, 0, 0, 5],
...                  [7, 7, 0, 5, 5, 5],
...                  [7, 7, 0, 0, 5, 5]])
>>> segm = SegmentationImage(data)
>>> segm.remove_masked_labels(mask, partial_overlap=False)
>>> segm.data
array([[0, 0, 0, 0, 4, 4],
       [0, 0, 0, 0, 0, 4],
       [0, 0, 3, 3, 0, 0],
       [7, 0, 0, 0, 0, 5],
       [7, 7, 0, 5, 5, 5],
       [7, 7, 0, 0, 5, 5]])
- reset_cmap(seed=None)[source]#
Reset the colormap (
cmapattribute) to a new random colormap.- Parameters:
- seedint, optional
A seed to initialize the
numpy.random.BitGenerator. IfNone, then fresh, unpredictable entropy will be pulled from the OS. Separate function calls with the sameseedwill generate the same colormap.
- to_patches(*, origin=(0, 0), scale=1.0, **kwargs)[source]#
Return a list of
PathPatchobjects representing each source segment.By default, the patch will have a white edge color and no face color.
- Parameters:
- originarray_like, optional
The
(x, y)position of the origin of the displayed image. This effectively translates the position of the polygons.- scalefloat, optional
The scale factor applied to the polygon vertices.
- **kwargsdict, optional
Any keyword arguments accepted by
matplotlib.patches.PathPatch.
- Returns:
- patcheslist of
PathPatch A list of matplotlib patches for the source segments.
- patcheslist of
- to_regions(*, group=False, **kwargs)[source]#
Return the
regions.Regionobjects representing the source segments.The returned polygon region objects are defined as the exteriors of the source segments. Interior holes within the source segments are not included.
See the
groupkeyword below for details about how non-contiguous segments for a single label are handled.- Parameters:
- groupbool, optional
If
False(the default), then aregions.Regionsobject will be returned with a flattened list ofPolygonPixelRegionobjects. Note that in this case, there will be multiplePolygonPixelRegionobjects for a single label if the label has non-contiguous segments. Because of this, the number of regions returned may not be equal to the number of unique labels in the segmentation image.If
True, then a list ofPolygonPixelRegionorRegionsobjects will be returned. There will be one item in the list for each label. If a label has non-contiguous segments, then the item will be aRegionsobject containing multiplePolygonPixelRegionobjects for that label.- **kwargsdict, optional
Any keyword arguments accepted by
regions.RegionVisual. Common keywords includeedgecolor,facecolor,color,linewidth, andlinestyle.
- Returns:
Notes
If
group=False, then the number of regions returned may not be equal to the number of unique labels in the segmentation image. This occurs when the segmentation image contains non-contiguous segments for a single label. That can happen as a result of slicing the segmentation image where a segment label is split into non-contiguous segments.The meta attribute of the
PolygonPixelRegionobjects will contain the label number as an integer value under the ‘label’ key. This can be used to identify the label of the region.